lunedì 6 gennaio 2020

Giarrettiere: dalla pecora e dal bronzo / From sheep and bronze to garters

Gli ultimi mesi del 2019 sono stati dedicati a un piccolo progetto, con l'obiettivo di partire dalle materie prime per arrivare all'oggetto finito.

We spent the past months of 2019 working on a small project, with the aim to start from scratch and to obtain a finished object. 


Le giarrettiere / Garters

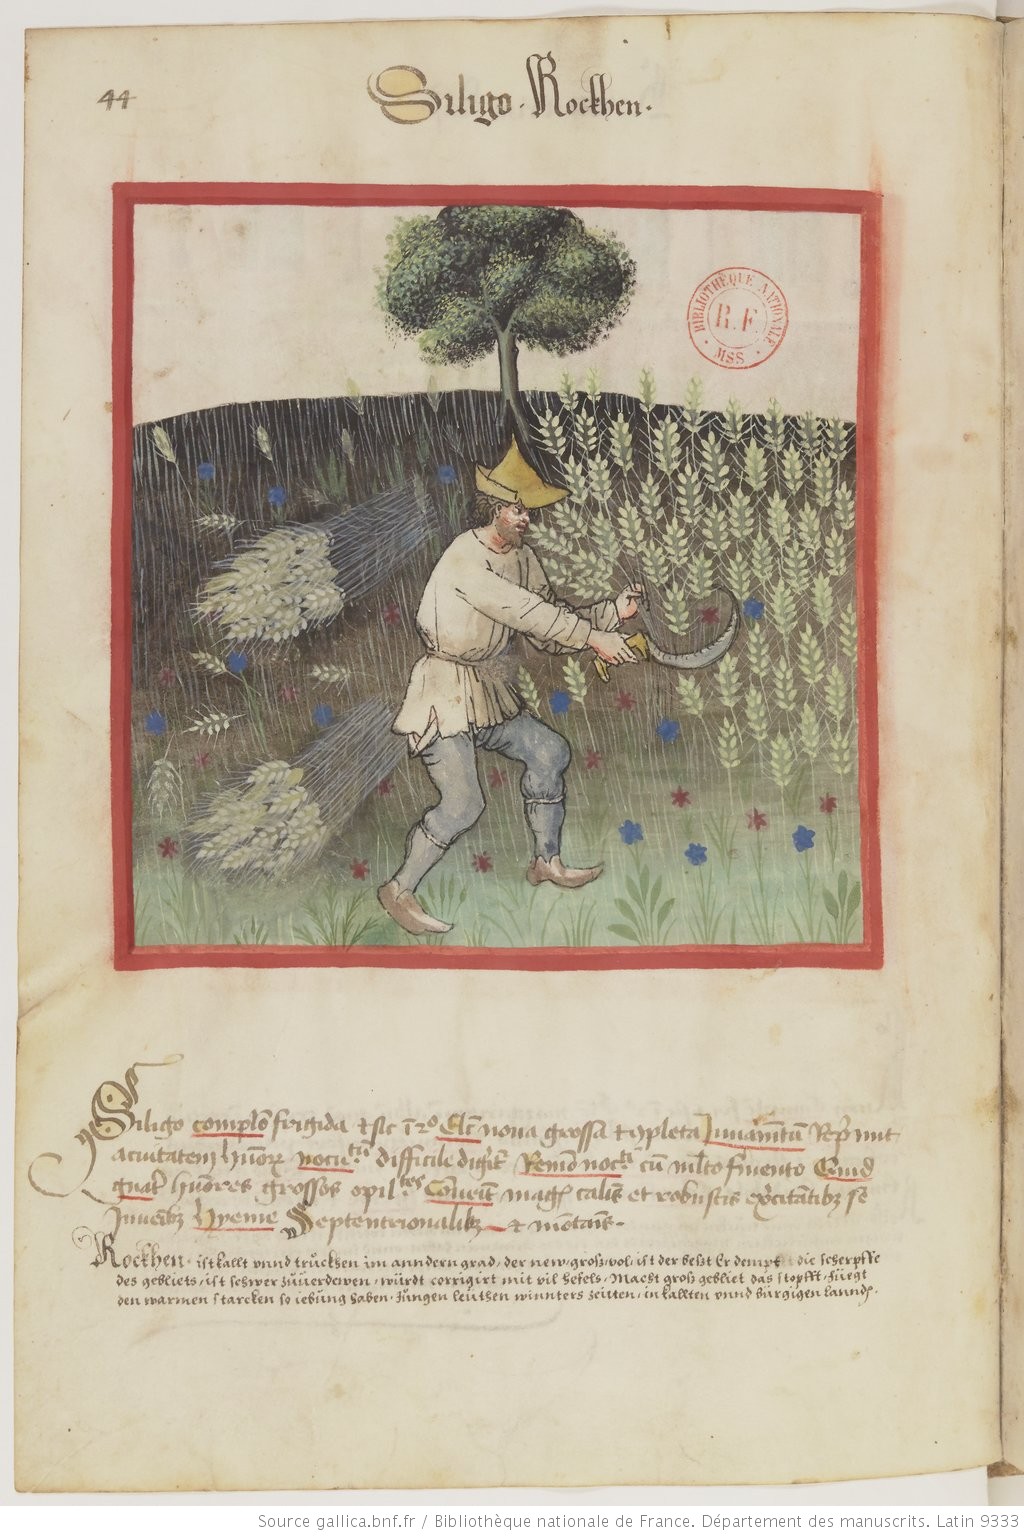
Un esempio di giarrettiere, indossate
da un contadino./ An example of garters,worn by a farmer.
BnF Lat. 9333,  fol. 44 v.
(prima metà XV sec./ 1st half 15th cent.)
L'oggetto che volevamo realizzare è un semplice paio di giarrettiere in lana, chiuse da una fibbia di bronzo, da accompagnare al set di abiti del falegname Pirondino. Le giarrettiere sono un oggetto un po' elusivo: le loro raffigurazioni risultano rare sulle figure di ceto medio, mentre se ne intravede qualcuna su personaggi di ceti più bassi oppure se ne possono individuare varianti più ricche ed elaborate su personaggi più eleganti. In quest'ultimo caso, spesso si vede che ne è indossata solamente una: viene così enfatizzato l'aspetto estetico e decorativo rispetto all'effettiva funzione pratica. La funzione della giarrettiera, indossata sotto il ginocchio, è infatti quella di tenere ben tese e in posizione le calzabraghe, che la moda trecentesca pretende attillate e ben modellate per sottolineare la gamba maschile, come si vede dalle iconografie ma anche da alcuni riferimenti documentari. Ad esempio Francesco Datini, il ricco mercante di Prato, rimanda al sarto un paio di calzabraghe perché non erano abbastanza aderenti. Per i ceti più bassi, magari impegnati in lavori più pesanti, le giarrettiere potevano essere utili per tenere in posizione delle calzabraghe, sformate dal tempo e dal lavoro, che tendevano a spostarsi durante le attività fisiche più impegnative. Abbiamo quindi ipotizzato che l'abito da lavoro di un falegname potesse essere completato da questo accessorio, in grado di risolvere il problema delle calzabraghe che tendevano a scendere, più volte segnalato da Francesco. 

The object we wanted to make was a simple pair of woolen garters, closed by a bronze buckle, for carpenter Pirondino's outfit. Garters are an elusive item. You can rarely see them on middle-class characters, while you can sometimes spot them on people from the lower classes or you can see some posh and elaborated ones on rich people and noblemen. You can often see that elegant people wear only one garter: this means they use it a decorative item and that it doesn't have any practical purpose. The actual purpose of garters, normally worn under the knee, is to keep the hoses well stretched and in place, as well-fitted hoses that emphasyze men's legs are a cornerstone of late 14th century fashion. You can see this feature in many pictures but you can also find it in documents: for example, Francesco Datini, the rich merchant of Prato, sends back to his tailor a pair of hoses that weren't tight enough so they can be fixed. For working class men, garters would have been useful to keep the hoses in place and prevent them from slipping down, once they became loose and worn out because of hard work and time. Thus, we thought that a simple pair of garters could be a useful accessory for a carpenter's workwear and that they could solve the problem of slipping hoses, reported several times by Francesco.

La stringa di lana / The woolen band

Lana di pecora Aland. / Aland sheep wool.
Ho scelto di utilizzare la lana perché:
- trattandosi di giarrettiere per l'abito da lavoro di un falegname, ho escluso la seta, troppo pregiata e delicata
- nastri e giarrettiere di lana sono stati individuati  negli scavi di Londra (p. 141-144) e la loro esistenza anche in Italia può essere intuita da alcuni passi di Statuti delle Arti della lana, in cui si vieta di realizzare "cinture e cinturine" di lana (non è chiaro il motivo del divieto - forse per evitare la dispersione del prezioso materiale, utilizzato per tessere grandi pezze di tessuto, in piccoli oggetti? Generalmente, comunque, la presenza di divieti di questo tipo presuppone l'esistenza in circolazione dell'oggetto vietato stesso).
- la scelta della lana mi permetteva di partire dalla preparazione della materia prima.

Filare con la rocca e il fuso. / Spinning with distaff and spindle.
I chose wool because:
- being garters for a carpenter's working outfit, I avoided silk, as it was too precious and fragile
- woolen bands and garters have been found at London's docks (Textiles and Clothing 1150-1450, p. 141-144). They most likely existed in Italy too, as in some Statues of the Arte della Lana (wool industry) it's said it's forbidden to weave "belts and small bands" made of wool (the reason of the prohibition it's not clear - maybe to avoid the scattering of the precious material, that was supposed to be used to make big cloths, in small items? Anyway, even if it may sound weird, the ban of an item generally means that it actually existed).
- wool allowed me to start from the preparation of the raw material itself. 

Il filo, pronto per essere montato sul pettine. /
The thread, ready to be set on the rigid heddle.
 Ho scelto quindi di rifarmi a uno specifico reperto di Londra, il n. 387 (Fig 111 C), realizzato con fili di lana pettinata singoli, filati con torsione a Z, con la densità di 28/12 fili/cm rispettivamente in ordito e in trama, per una larghezza di soli 13 mm, tessuto con la tecnica "tabby" (tessitura piana). Non è stato possibile individuare la funzione originariamente svolta dal frammento, ma ho ritenuto che si trattasse di una costruzione talmente semplice da potersi adattare facilmente a un paio di giarrettiere.
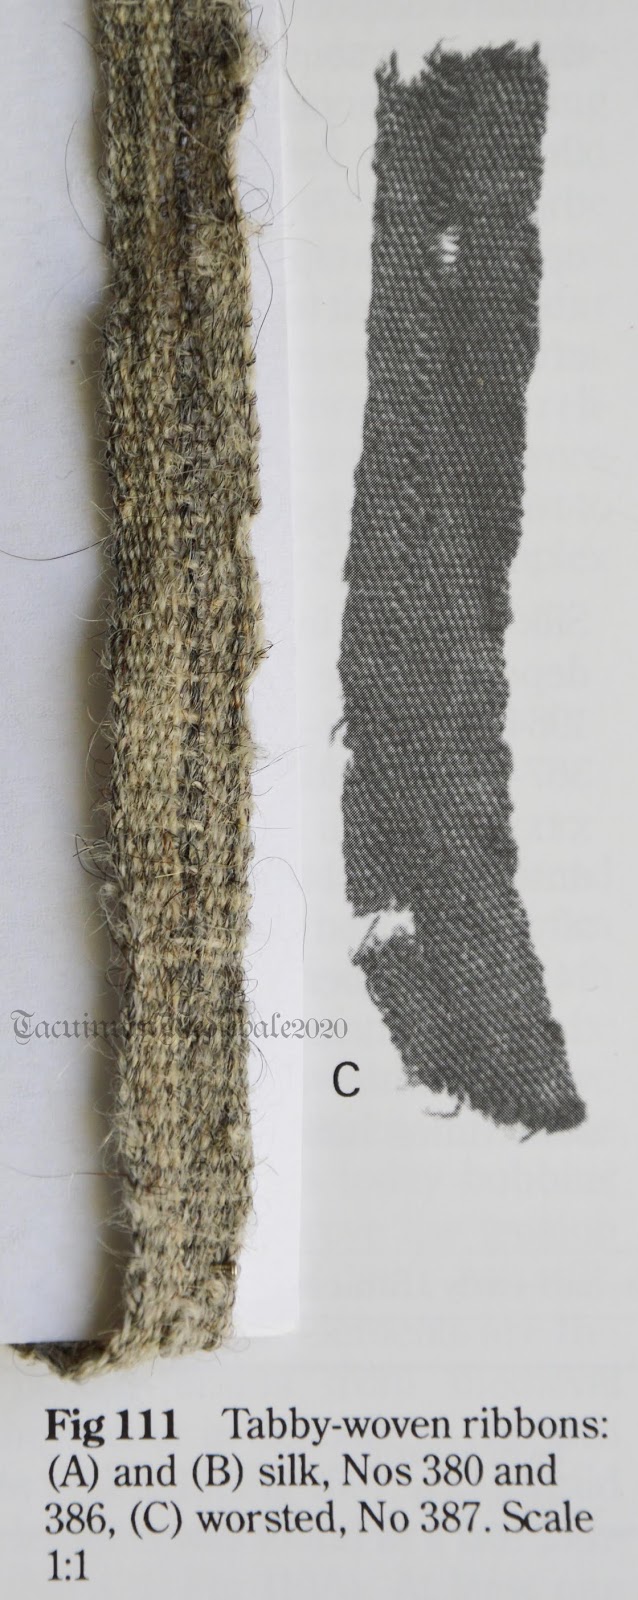
I chose to pick a specific find from London, n. 387 (Fig. 111 C): it's made of worsted wool threads, singles, Z-spun, with 28/12 threads per cm in warp/weft. It's only 13 mm wide and it's a tabby weave. It wasn't possible to find out the original function of the fragment, but I think it's such a simple weave that it could have been easily used to make a pair of garters.


Tessendo la stringa con il pettine-liccio. /
Weaving the band with the rigid heddle.
La lana che ho scelto di utilizzare mi è stata regalata da Mervi. Si tratta di una lana grigia di una razza di pecora finlandese primitiva, molto rara, che si chiama Åland sheep: le razze primitive sono razze di pecore che non hanno subito sostanziali modificazioni nel tempo ed hanno quindi mantenuto caratteristiche arcaiche che le rendono simili alle razze medievali, o a quelle ancora più antiche. In questo caso, avevo a disposizione un grande quantità di fiocchi, costituiti generalmente da fibre più chiare molto soffici, con la presenza di alcune fibre nere più spesse e rigide. La lana era stata lavata in precedenza, per cui ho solamente dovuto aprire le fibre con un pettinino per rimuovere lo sporco rimasto per poi procedere alla pettinatura vera e propria.  Dal momento che i miei pettini medievali sono piuttosto grossi e non ero certa che riuscissero a preparare la lana in maniera sufficientemente uniforme, ho utilizzato dei pettini moderni molto fini (Louet minicombs). Finalmente ho poi potuto iniziare a filare, con la rocca e il fuso: ho prima realizzato alcuni campioni per capire quanto doveva essere sottile il filo per corrispondere il più possibile al reperto, testandone anche la resistenza, assestandomi poi su uno spessore che ritenevo idoneo. Dopo la filatura, ho fatto una matassa, l'ho lavata in acqua tiepida, l'ho appesa ad asciugare con un peso per fissare la torsione e l'ho stirata con il vapore, sempre per rendere il filo più stabile.

Lo spessore della stringa e dei fili. /
The width of the band and the tickness of the threads.
I chose to use some grey wool, given to me by Mervi. This wool comes from from a rare, primitive Finnish breed, called Åland sheep: primitive breeds are breeds that haven't been crossed with other breeds or modified through time, so they keep some archaic features that make them similar to Medieval or even older breeds. 
In this case, I had many locks that featured lighter, soft fibers mixed with some darker, thicker and hairy fibers. Wool had already been washed, so I only needed to remove some more dirt with a small comb before actually combing them. As my medieval wool combs are quite big and I wasn't sure they could comb the wool evenly enough, I used some very fine modern combs (Louet minicombs). After combing the wool, I dressed my distaff and picked one of my spindles to male some tests to see how thin the thread had to be to match with the find and how strong it needed to be, in order to be woven. After the spinning, I made a skein, I washed it in warm water, I hanged it to dry with a weight to settle the twist and finally I ironed it and steamed it. 

La mia giarrettiera a confronto
con il reperto originale. / My band
and the original find.

Per realizzare una tessitura "tabby" si può utilizzare il pettine liccio: ho quindi preparato l'orditura e montato l'ordito sul mio pettine. Alla fine, per ottenere la stessa larghezza del reperto ed avere comunque un filo abbastanza solido, ho diminuito il numero di fili dell'ordito (da 36 a 30, anche in funzione delle dimensioni del mio pettine liccio, che non è abbastanza largo per 36 fili) ed anche la densità dei fili di trama è leggermente inferiore (10 rispetto a 12). Come mi aspettavo, durante la tessitura ho dovuto fronteggiare la rottura di diversi fili, sia per la loro fragilità, sia per alcune irregolarità nel legno del pettine. Sono comunque riuscita a riparare i fili e a completare circa 120 cm di tessitura, da cui ho ricavato le 2 giarrettiere, che sono lunghe circa 43 cm più i margini per la rifinitura.
Sono stata molto orgogliosa del risultato, nonostante le piccole discrepanze rispetto al reperto di riferimento, e ho sicuramente imparato molto sulla qualità della mia filatura. Il modo migliore per conoscere il proprio filo filato a mano, infatti, è usarlo.

To make a tabby woven band it's possible to use a rigid heddle: I prepared the warp and set it on my rigid heddle. In the end, to be able to obtain the same width as the find, I reduced the number of threads in the warp as they are slightly thicker than the originals: so I had 30 instead of 36, considering also that my rigid heddle wasn't wide enough for 36 threads. The density of the weft is slightly lower too (10/cm instead of 12/cm). As I expected, during the weave I had to face the breakage of several threads, both because of their fragility and of some sharp spots on the heddle. Anyway I managed to fix them and weave about 120 cm of the band. Each garter is 43 cm plus some extra centimeters for finishing and for attaching the buckle. 
I am very proud of the result, even if there are some small differences from the original find. I also learnt a lot about my spinning: the best way to get to know your handspun is actually to use it!

Le fibbie / The buckles

Il modello in cera e il disegno dell'originale. / The wax
prototype and the drawing of the original.
Francesco si è invece occupato della creazione delle fibbie. Per prima cosa abbiamo individuato il modello: anche in questo caso abbiamo scelto come riferimento un reperto degli scavi di Londra presente in Dress Accessories 1150-1450, uno dei pochi testi che fornisce informazioni abbondanti e precise su questo tipo di oggetti. Il reperto scelto è il n. 297 (p. 73), datato 1350-1400, una fibbia di tipo semplice, simile ad altre presenti anche in area italiana. Per prima cosa è stato realizzato un modello in cera, poi il modello in cera è stato usato per fare il negativo sulla terra, in cui è stato poi colato il bronzo fuso, utilizzando un fornetto per la fusione dei metalli. Le fusioni sono poi state rifinite e completate con l'ardiglione.

La fibbia in bronzo e il disegno dell'originale. /
The  bronze buckle and the drawing of the original.
Francesco took care of the buckles instead. First, we chose the shape: again, we chose one of the finds from London showed in Dress Accessories 1150-1450, one of the few books that gives detailed information about this kind of items. The chosen find is n. 297 (p. 73), dated 1350-1400. It's a simple buckle, not very different from other similar finds we have seen in Italy. First, Francesco made a wax prototype of the buckle, then he used it to prepare the mold in the sand and he melted the bronze, using a specific oven. Then, the buckles have been refined and the pin was added.

Il fornetto per la fusione del bronzo. / The bronze oven.
Le fibbie immediatamente dopo la fusione. /
The buckles righ after the casting.
Si è trattato di un lungo processo per la realizzazione di un piccolo oggetto che probabilmente, durante gli eventi, passerà inosservato. Più di tutto, però, ci interessa aver fatto un passo avanti nella pratica e nella conoscenza di nuove tecniche e siamo orgogliosi di utilizzare un oggetto completamente realizzato da noi. / It has been a long process to make a very small object, that probably won't even be noticed during the events. But most of all, what matters to us is that we made a step further in the practice and knowledge of new techniques and we are proud to use something completely made by us.

domenica 29 dicembre 2019

"With one needle": un libro sul needlebinding / "With one needle": a book about needlebinding

"With One Needle. How to nålbind" - Mervi Pasanen

La prima volta che ho incontrato Mervi è stato al suo workshop di needlebinding, a Battle of Wisby 2013. Non sapevo niente di questa tecnica, ma ero comunque curiosa di provare: scoprii così che il needlebinding, che letteralmente significa "legare con l'ago", è una tecnica molto antica (di cui ci sono testimonianze già 4000 anni fa) e ancora oggi diffusa in particolare in Nord Europa. Nota nel bacino del Mediterraneo a Egizi e Romani e diffusa presso le popolazioni vichinghe nei Paesi Scandinavi, questa tecnica viene utilizzata fino al Medioevo per realizzare prevalentemente guanti, calzini e berrette di lana. L'unico strumento necessario è un semplice grosso ago, realizzato in osso, legno o metallo.

The first time I met Mervi was at her needlebinding workshop, duing Battle of Wisby 2013. I didn't know anything about this technique but I still wanted to try it. I found out that "needlebinding" means "to bind with a needle" and that is a very old technique. There are findings from 4000 years ago and it's still practiced nowadays in Northern Europe. Needlebinding was used by the Egiptian and the Romans, it was known by the Vikings and it was used also in the Middle Ages. It was mainly used to make gloves, socks and hats. The only tool required is a simple, big needle made of bone, wood or metal. 

La versione finlandese del libro e i miei primi calzini realizzati
con il needle binding. / The finnish version of the book and my
needlebound socks.
Ci è voluto un po' di tempo, ma durante una gita in Finlandia e grazie alla pazienza di Mervi, l'anno scorso ho ripreso in  mano l'ago e ho completato il mio primo paio di calzini. Ho ricevuto anche il suo libro dedicato al needlebinding, che è stato una preziosa guida grazie alle chiare foto dei passaggi, anche se l'unica versione disponibile in quel momento era quella finlandese. Sono quindi stata ancora più felice di scoprire che era in programma anche una traduzione inglese: ora che ce l'ho tra le mani, posso finalmente apprezzarlo pienamente.
Il libro è dedicato in particolare alla tradizione finlandese, che è rimasta ininterrotta dall'antichità ad oggi. Nel libro troverete:
- una prefazione e un'introduzione storica sul needlebinding, da cui è possibile avviare ulteriori ricerche più dettagliate
- un'introduzione sulla tecnica e sui materiali utilizzati (filati e aghi)
- una sezione dettagliata e ricca di fotografie dedicata all'avvio del lavoro, in cui vengono illustrate le tecniche possibili, dalle più semplici a quelle più complesse che prevedono anche più colori, e le istruzioni per calare e crescere i punti.
- la spiegazione delle diverse tipologie di punto utilizzate nel libro e le modalità di annotazione
- le istruzioni su come realizzare le parti "critiche" di guanti e calzini, ovvero il pollice e il tallone
- infine, un'ampia sezione con le istruzioni per realizzare numerose tipologie di guanti, calzini, cappelli e scialli con modelli e decorazioni diversi, corredate dalle indicazioni sulla tipologia e sulla quantità di lana richiesta per il progetto e accompagnati da foto a colori dei progetti finiti.

It took me some time, but during a trip to Finland and thanks to Mervi's patience, last year I picked up my needle again and I made my first pair of socks. I also received her book about needlebinding, that was a very helpful guide with its clear pictures of the instructions, even though the only available version was the Finnish one. I was very happy to hear there was an English translation coming: now that I have it in my hands, I can fully appreciate it. 
The book is focused on the Finnish tradition, "one of the few ones in the world that has remained unbroken through centuries". In the book you will find:
- a preface and an historical introduction about needlebinding, which is a good starting point for more research

- an introduction about the technique, tools and materials (yarn and needles)
- a very detailed section about the starts with lots of pictures, from the easy ones to the most difficult ones, with up to 3 colours, and the instruction about how to increase and decrease
- the description of the stitches used in the book and their notation
- the instructions on how to make the most sensible parts of socks and mittens, i.e. heels and thumbs
- a wide section with the instructions to make several kinds of mittens, socks, hats and shawls, with different patterns and decorations, complete with the kind and amount of yarn needed and pictures of the finished projects.
Una pagina di esempio: come fare il pollice dei guanti. /
A sample plage: how to make the thumb in mittens.

Il libro contiene tutto quanto è necessario sapere sul needlebinding per iniziare a praticarlo e per riuscire a portare a termine i propri progetti, senza sentirsi smarriti di fronte a una tecnica nuova e magari poco conosciuta, grazie alle istruzioni dettagliate e chiare che possono essere seguite passo-passo (anche per chi non conoscesse bene l'inglese). Un altro aspetto che apprezzo molto di questo libro è la versatilità degli oggetti che si possono realizzare: alcuni tipi di calzini o di guanti sono ispirati a dei reperti originali e possono quindi essere utilizzati anche per la rievocazione, ma possono essere indossati anche nella vita di tutti i giorni. Cosa c'è di meglio di un allegro paio di colorati guanti a righe in una grigia giornata di pioggia, o di un bel paio di calzettoni di lana per tenere i piedi al caldo in casa? Proprio per questo il libro non si rivolge esclusivamente ai rievocatori, ma a tutti gli appassionati di artigianato tessile, magari desiderosi di imparare una tecnica diversa dal più comune lavoro a maglia o uncinetto. Le potenzialità sono davvero infinite: una volta che avrete familiarizzato con la tecnica, potrete anche portare un progetto sempre con voi, visto il minimo ingombro degli strumenti necessari, e divertirvi ad osservare le espressioni stupite di chi vi vedrà utilizzare una tecnica mai vista prima!
Alcune opzioni per decorare i guanti. / Many options for decorating gloves.

The book has everything you need to know to start needlebinding and to be able to happily finish your projects, without feeling lost in front of a new and not-so-well-known technique, as the instructions are clear and easy to follow.
 I also love that you can needlebind socks and mittens for re-enactment, as some of the patterns are based on historical finds, but also for everyday life. What can make you happier than a colourful pair of striped mittens on a gray rainy day? What's better than a thick pair of wool socks to keep your feet warm? That's why the book is not only for reenactors, but for all the textile crafts enthusiasts who would love to learn a new craft, something different from the more common knitting or crochet.  There are endless possibilities, and once you have become familiar with the technique, you can bring your project along with you wherever you go, as you only need a small needle to work with. You will then have some fun looking at the suprised faces of people who will look at you while needlebinding and wonder what kind of new technique you are using! 

L'autrice / The author: Mervi Pasanen: Swan River Crafts
Mervi è un'artigiana esperta e versatile, che da anni studia e insegna numerose tecniche antiche, tra cui la tessitura a tavolette e il needlebinding. Mervi is an experienced and versatile textile crafter: she has been studying and teaching anciet techniques, i.e. tablet weaving and needlebinding, for many years.

L'editore/ The publisherChronocopia Publishing

La pagina Facebook del libro / The Facebook page of the bookWith one needle - How to needlebind

Dove trovare il libro/ Where to find the book:
Amazon
Handelsgillet

giovedì 22 agosto 2019

I vestiti di robbia / The madder dresses

Gli abiti finiti e la ricostruzione della scena tratta dalla miniatura (Ms. Casanat. 4182, tav. 119). /
The finished garments and the reconstruction of the scene from the manuscript. (Ms. Casanat. 4182, tav. 119)

Dopo qualche anno di piccole o grandi sperimentazioni con la tintura e dopo aver finalmente acquisito una pentola sufficientemente grande, nella primavera del 2018 ho deciso che era il momento giusto per dedicarmi a un progetto più impegnativo: volevo avere un intero set di vestiti, composto da veste e sopraveste, tinto con la robbia, una materia tintoria con cui ho una certa familiarità e con la quale speravo di ottenere colori soddisfacenti, utilizzando diversi bagni. Ho trovato varie immagini, in particolare nei Tacuina Sanitatis, che mostrano l’accostamento di vesti e sopravvesti di tonalità simili. Ne ho scelta una in particolare, che mostrava anche l’allacciatura sul fianco, perché volevo utilizzare questa modalità di chiusura per ottenere un modello aderente (Ms. Casanat. 4182, tav. 119: "Pane Bianco"). 

Un altro motivo per cui ho scelto questi modelli è la loro ampia diffusione testimoniata da diverse fonti coeve, in particolare dai Tacuina Sanitatis. Utilizzerò questi abiti per rappresentare un ceto medio cittadino, in particolare quando sarò impegnata nel progetto di ricostruzione della Spezieria di Diotaiuti.


After a few years of big or small experiments with plant dyeing, I bought a pot big enough and in Spring 2018 I decided to start a much bigger project. I wanted to plant-dye with madder a full set of clothing, made of a dress and an overdress. I am quite familiar with madder, so I hoped to achieve nice shades of colour, using several baths. I found a few pictures from Tacuina Sanitatis showing women wearing a dress and an overdress in similar colours. As a reference, I chose the one that also displayed a side lacing, as I was going to use this fastening technique to close it and to be able to obtain a fitted model ((Ms. Casanat. 4182, tav. 119: "White bread"). Another reason why I chose this enluminure as a source is because the garments represented are common in many pictures of the period, expecially in the Tacuina Sanitatis. I will use this outfit mainly to represent a middle-class citizen, for example when taking part in the display of Diotaiuti's Apothecary shop.

Dettagli costruttivi della veste. /
The dress construction details.
Per prima cosa ho scelto i tessuti da utilizzare: per la veste, una lana bianca (twill) piuttosto leggera, che avevo già testato in passato per verificare che recepisse il colore, mentre per la sopraveste una lana bianca a tessitura piana più spessa, leggermente follata, acquistata da Faserhaus. Non immaginavo che la lana fosse così bella, si è rivelata un tessuto perfetto da tingere e veramente azzeccato per il progetto. Dal momento che il primo bagno di tintura è quello che offre il colore più intenso, mentre quelli successivi producono colori sempre più tenui, ho deciso di riservare il bagno più intenso alla sopraveste, capo che per eccellenza dovrebbe rappresentare lo status, utilizzato per uscire di casa e presentarsi in pubblico, nonché quello più pesante (in termini di peso del tessuto: circa 2 kg), mentre ho sfruttato il secondo bagno per la veste, più leggera (1,5 Kg) e di uso più quotidiano. Nel terzo bagno invece ho tinto altri scampoli di tessuto. 

First I chose the fabric: a light twill for the dress I had already tested to check it was dyeable and a thicker, plain white wool, tumbled to make it slightly felted, bought from Faserhaus. I couldn’t imagine this wool to be so amazing, it’s a perfect fabric to be dyed and used for heavier garments, such as overdresses or cloacks. Now I had to choose which fabric to dye first: the first bath gives the strongest and most intense colour, while the following baths give lighter and less strong colours. I decided to use the first bath for the overdress, which is the garment that was supposed to show its owner’s status when worn in public and also because it was the heaviest fabric (2 kg). The second bath was going to be used for the dress (and it’s much lighter: 1,5 kg), while the third bath was for some small pieces of leftover fabric.


Esempi dei tre bagni di robbia. /Samples of he three madder dyes.

La pianificazione è tutto! Per riuscire a gestire meglio la stoffa all’interno del pentolone, ho deciso di tagliare i pannelli che compongono gli abiti prima della tintura, tagliando semplici triangoli, rettangoli e trapezi in base a modelli che avevo già realizzato, e lasciando  ampi margini di cucitura anche in caso di restringimento del tessuto durante la tintura. Ho pesato la stoffa, suddiviso i tessuti per i 3 bagni, includendo anche un po’ di filo di lana che avrei utilizzato per cucire, e ho calcolato le quantità di mordente e di robbia che avrei dovuto utilizzare. 
Mi sono servite circa 4 giornate di lavoro per tingere tutti i 5 kg di stoffa: 2 per effettuare la mordenzatura, 2 per la tintura. Per fortuna ho potuto sfruttare una stufa a legna e ampi spazi all’aperto.


L'allacciatura della sopraveste: si vede bene
anche la tipologia del tessuto. / The lacing of the
overdress: note the fabric.
Planning is everything! To be able to manage all that fabric in the pot, I decided to cut the dresses first, making simple squares, rectangles and triangles based on toiles I already had. I left decent sewing allowances and spare fabric, as the wool might shrink when dyed. I weighed all the fabric for the 3 baths, including also some wool sewing thread, then weighed the mordant and madder I was going to use. It took me 4 days to mordant and dye everything (about 5 kg of fabric). Luckily I could use a stove and an open space.

Sono rimasta quasi stordita dalla riuscita del primo bagno: il colore è risultato intenso e soprattutto uniforme oltre ogni mia aspettativa! Il lavoro di cucito è però iniziato dalla veste: ho usato uno dei miei modelli preferiti, con 2 pannelli laterali, ispirato al reperto D10584 (Norlund n. 42) dei reperti di Herjolfsnes. I bottoni sulle maniche sono bottoni cavi, realizzati da noi in ottone sulla base di reperti locali. Ho potuto inaugurare questo vestito a giugno 2018 al Middelaldercentret in Danimarca. 
I bottoni cavi. / The hollow buttons.
La sopraveste invece ha dovuto attendere i mesi autunnali ed invernali. La stoffa mi ha dato grandissima soddisfazione e si è rivelata molto adatta sia per il fitting del busto che per le morbide pieghe dell’ampia gonna. Le maniche, larghe 40 cm al polso, ricalcano i numerosi esempi dei Tacuina Sanitatis: credo sia una misura piuttosto comoda, che permette di muoversi e svolgere attività piuttosto agevolmente, magari ripiegandole un po’. Credo che dovrò intervenire per modificare leggermente la forma della manica sulla spalla, perché la stoffa è rigida e fa un po’ difetto. Una differenza, rispetto alla miniatura di riferimento, è la scollatura, che nel mio caso è molto più ridotta: è forse meno comune, ma comunque presente in altre fonti coeve. 

I was shocked to discover how good the first bath was: the colour is intense and more uniform than I could imagine! I had to start with sewing the dress though: I went for one of my favourite models, with 2 side-panels, based on Greenland find D10584 (Norlund n. 42). The buttons on the sleeves are hollow: we made them according to some local finds. I could wear this dress for the first time in June 2018 at Middelaldercentret in Denmark.
The overdress had to wait for Autumn and Winter to come. The fabric was perfect both for the tight-fitting bust and for the wide gown. The sleeves, that are 40 cm wide on the edge, match many pictures from the Tacuina Sanitatis: I think they are still comfortable to move in and work with, and they can also be folded. I think I will have to alter the sleeve a bit as the fabric doesn’t behave as I would like on the shoulder. A detail that differs from the source is the neckline: mine is much smaller, and maybe less common, but still visible in other sources. 

 
La veste/ The  dress, Middelaldercentret (Danimarca) 2018
La sopraveste / The overdress, Abbazia San Nazzaro Sesia, 2019


Visto che ci tenevo particolarmente a completare l’insieme anche con dei nuovi accessori adeguati, ho realizzato un cappuccio e delle calze in lana verde, tinta da Historical Textiles, e per l’acconciatura un nastrino che ho tessuto a tavolette con della seta tinta da Mervi con il legno del Brasile, che mi ha donato anni fa e che custodivo in attesa del progetto giusto. 

As I wanted to complete the ensemble with new, appropriate accessories, I made a hood and a pair of hoses out of some green wool dyed by Historical Textiles. I also had some filament silk that Mervi plant-dyed with brazilwood and gave me many years ago as a gift: I was saving it for a perfect project, and I used to make a tablet woven ribbon for the hair-style. 


martedì 20 novembre 2018

Medieval beauty: ricostruzione storica, autenticità ed estetica. / Medieval beauty: living history, authenticity and aesthetics.

Elina è una rievocatrice esperta, attiva nell’ambito della rievocazione medievale in Finlandia dal 1995, autrice dal 2007 del blog “Neulakko” e membro dei Merry Swan: è uno dei miei miti indiscussi a partire dal giorno in cui mi sono accorta di amare il XIV secolo. Gli articoli sul suo blog, in particolare quelli sui veli, sono sempre stati un punto di riferimento, così come i suoi abiti e il loro accostamento con gli accessori giusti sono fonte di ispirazione. Recentemente, alla conferenza dedicata alla ricostruzione storica “Reconference 2018” (i video sono disponibili qui) Elina ha moderato una tavola rotonda sul tema dell’autenticità e dell’estetica: mi è sembrata quindi una buona occasione per chiederle di condividere alcune riflessioni su questi temi. Grazie mille Elina per la disponibilità!

Elina is an experienced re-enactor, active in the medieval scene in Finland since 1995, author of the blog “Neulakko” since 2007 and member of the group Merry Swan: she’s been one of my idols since the day I realized I was in love with 14th century. Her articles, especially the ones about veils, have always been a point of reference, just as her dresses and their combination with the right accessories are an endless source of inspiration. Recently, during the “Reconference 2018” (a conference about re-enactment, you can see the videos here), Elina moderated a panel about authenticity and aesthetics: it seemed to me a good chance to ask her to share a few thoughts about this subject. Thank you so much Elina![ENGLISH FOLLOWS]

Elina, cosa significa per te “avere un’estetica medievale”?
È una parte rilevante nel mio tentativo di proporre una rappresentazione il più autentica possibile. Per me l’autenticità è importante per rendere giustizia alle persone del passato che rappresentiamo: dobbiamo farlo raccontando una storia che sia bilanciata, basata sulle fonti e soltanto su quello, la storia di persone che hanno vissuto in un tempo e in una società differenti, con credenze e mezzi di sostentamento molto diversi da quelli di oggi, ma di persone che erano comunque esseri umani con speranze, paure, amore e dolore proprio come noi. 

Perché è così difficile per noi persone moderne accettare di avere un aspetto diverso durante le rievocazioni? E perché invece dovremmo non solo accettare, ma abbracciare una diversa estetica?
Credo sia perché il gusto estetico è radicato talmente tanto in profondità nella nostra cultura e in noi stessi che diventa per noi quasi invisibile. È facile pensare che quello che è bello per me, ora, sia qualcosa di universalmente bello! Ma abbandonare il gusto estetico moderno e seguire quello medievale può essere molto gratificante: spesso è proprio quello che serve per fare rimanere senza fiato le persone e sentirle esclamare “sembra che tu sia appena uscito da un manoscritto!”


Qual è per te la rinuncia più difficile? C’è qualcosa del tuo aspetto quotidiano che ti manca quando sei in abiti medievali?
Questa è facile: il trucco moderno! Mille volte! Non truccarmi è davvero difficile per me, perché adoro il make up e tutto quello che lo riguarda. Quindi, “nel medioevo” mi manca avere le sopracciglia, lunghe ciglia e la pelle perfetta. Ma in ogni caso, ormai sono così abituata a non truccarmi in rievocazione che ora mi sembra veramente strano e sbagliato quando, qualche volta, mi trovo a casa a fare esperimenti su come indossare il velo con un trucco completo.

Invece, cosa ti piacerebbe introdurre nella tua quotidianità dal XIV secolo? C’è qualcosa che hai già adottato?
Indossare il velo significa che non c’è mai una giornata in cui i capelli  non siano a posto e amo il comfort e la libertà di movimento che le gonne ampie forniscono, ma non ho introdotto nessuno dei due nella mia vita quotidiana! Comunque, i miei amici non -lhistorist (che non si occupano di living history, NdR) hanno commentato che sono una specie di maestra nella stratificazione dei vestiti, e credo di aver acquisito questa abilità grazie alla moda medievale.

Secondo te, quali sono le principali differenze tra l’estetica moderna e quella medievale?
Ci sono moltissimi aspetti, come la differente percezione di bellezza e decoro. Ma credo che le differenze più profonde e interessanti siano legate alle manifestazioni di genere, all’identificazione di cosa è femminile e cosa è maschile. Ci sono enormi differenze riguardo a quali parti del corpo devono essere nascoste e quali mostrate. Per esempio, conosco molti uomini che si trovano in difficoltà con lo stile medievale che prevede abiti aderenti ai fianchi e calzabraghe, perché il concetto moderno di mascolinità non riguarda esattamente l’esibizione delle proprie cosce sottili... Per le donne invece credo sia difficile entrare nell’ottica di un differente concetto di coprirsi, perché veniamo da un mondo con un concetto di “decoro” molto diverso.

Secondo la tua opinione, quali sono i punti chiave per una donna per ottenere un’estetica del XIV secolo convincente?
La chiave è la silhouette: la forma dei vestiti dovrebbe ricalcare l’aspetto di quelli medievali, e il modo migliore per ottenerlo è tagliare gli abiti sulla base dei modelli medievali, senza dimenticare l’uso di copricapi appropriati!

E per gli uomini?
Braghe, calzabraghe e vestiti che siano ben modellati addosso, ad esempio non troppo larghi. E il suggerimento di un copricapo adatto è valido anche per loro!

Qual è il tuo migliore consiglio per ottenere un look convincente?
Dedica del tempo ad osservare l’arte medievale per assorbire il gusto estetico, guardando sculture, dipinti, miniature così come gli oggetti. Poi: guarda il tuo equipaggiamento e confrontalo con quello che hai imparato. Chiediti: chi avrebbe indossato o utilizzato questo oggetto? Generalmente questo processo porta a una semplificazione dell’equipaggiamento: meno decorazioni, meno COSE (questo è il mio suggerimento preferito, perché non costa niente!).
***


Elina moderna... vs Elina medievale
Modern Elina vs Medieval Elina.
  

Elina, what does “having a medieval aesthetic” mean to you?
It’s an important part in my attempt at doing a portrayal as authentically as possible. And authenticity is important to me because I believe that it is something we owe to the people of the past that we portray: to tell a story that is balanced, evidence based and just. A tale of people in a different time and society with very different beliefs and means of survival than today. But of people that were human with hopes and fears and love and sorrow just like us. 

Why is it so difficult for us modern people to accept a different look during events? Why should we all embrace it instead?
I think it’s because aesthetics are set so deep in our culture and ourselves that they become almost invisible to us. It’s easy to think that what is beautiful to me now as something universal! But letting go of modern aesthetics and following the medieval look can be very gratifying: usually it’s doing just that that makes people gasp and say ”you look like you just stepped out of a manuscript”! 

What’s the hardest thing for you? Do you miss anything of your everyday look when you are in medieval clothes? 
This one is easy! Makeup! Times a hundred! Not wearing makeup is really hard for me because I love makeup and everything about it. So, in the middle ages I miss having eyebrows, long lashes and perfect skin. But then again -  I’m so used to not wearing makeup by now that it looks really strange and wrong to me when I sometimes practice veil styles at home in full makeup. 

On the other hand, what would you like to introduce in your everyday life from 14th century? Or is there something that’s already part of your daily life?
Elina e suo figlio: anche i bambini possono essere
perfetti rievocatori! /Elina and her son: children
can be super authentic re-enactors too
!
Wearing veils means there’s never a bad hair day and I love the comfort and freedom of movement the wide hems give. But not doing either in my everyday life!  However, my non-lhistorist (lhistorist = person involved in living-history activities( friends have commented that I am somewhat of a master in layering clothes and that is something I think I have picked up from medieval fashion. 

In your opinion, which are the main differences between modern aesthetics and medieval aesthetics?
There are so many things, like different perceptions of beauty and modesty. But I think the most profound and interesting differences are in the displays of gender: what is feminine and what is masculine. There are big differences in which parts of the body are to be hidden, what should be displayed. For an example, I know a lot of men struggle with the hip hugging styles and the hose, because modern masculinity is not so much about flaunting your slim thighs. For women the need to cover up is difficult, because we come from a world with very different standards of modesty. 

According to you, which are the key points for a woman to get a good 14th century aesthetic? 
It’s all in the silhouette: the fit of the clothes should follow the medieval look - the easiest way is to use medieval patterns. Also wearing a proper headcovering!

And for a man?
Hose and braies and a dress that is well fitting, i.e not too loose. And wearing headgear goes for men too!

What is your best advice to obtain a convincing look? 
Spend time looking at medieval art to absorb the aesthetic: mix looking at sculpture, paintings, miniatures as well as items. then: take a look at your kit and compare it with what you have learned. Ask yourself: who would have worn/used this? Usually this results in simplifying your kit: less embellishment, less THINGS. (This is my favourite tip because it doesn’t cost anything!)


Elina con i Merry Swan al Middelaldercentret in Danimarca. /
Elina with the Merry Swan at Middelaldercentret in Denmark.

mercoledì 12 settembre 2018

Prendersi cura dei vestiti medievali / Taking care of medieval clothes

Visto che siamo verso la fine della stagione rievocativa, ho chiesto a Maria Neijman, esperta e consulente del settore tessile, rievocatrice da molti anni e autrice insieme ad Amica Sundström del sito “Historical Textiles” di condividere qualche suggerimento per la cura degli abiti che indossiamo in rievocazione. L’intervista, realizzata da Marie Hedén, è apparsa in svedese sulla pagina Facebook della Medieval Week di Visby ed è stata tradotta e ampliata da Maria e da me.
As the re-enactment season is going towards its end, I asked Maria Neijman, expert and textile consultant, well known re-enactor and author of the website “Historical Textiles” with Amica Sundström, if she could share some advice about how to take care of our medieval clothes.
The interview, made by Marie Hedén, appeared in Swedish on the Facebook page of the Medieval Week of Visby and has been translated and extended by Maria and me. [ENGLISH BELOW]


Maria ed io a Urbino, per un'esposizione dedicata ai tessuti e alla loro produzione - Oratorio S. Giovanni Battista. /
Maria and me in Urbino, for a textile display in the Oratorio di San Giovanni Battista.
Qual è la prima cosa da fare quando si torna a casa dopo una rievocazione?
Disfare i bagagli! Non permettere ai vestiti umidi e sporchi di rimanere più del necessario in borse o bauli. Non è divertente disfare i bagagli un mese dopo e trovare i vestiti ammuffiti.


Parliamo di un tessuto alla volta: come ti prendi cura dei tuoi indumenti di lino?
Gli abiti di lino possono essere lavati in lavatrice, in base a quanto sono sporchi, a 40 o 60 gradi con un normale detergente senza sbiancanti ottici. Non usare ammorbidenti, perché rivestirebbero le fibre e impedirebbero all’umidità di penetrare, rendendo in questo modo gli indumenti in lino più caldi del necessario. Inoltre, nel corso del tempo, gli ammorbidenti rompono la fibra del lino.
Quando i vestiti sono lavati, assicurati di distendere le cuciture e di spianare i vestiti prima di appenderli su una gruccia o di appenderli al filo per la biancheria tramite delle mollette. Evita di appenderli di traverso direttamente sul filo, perché sarà molto difficile poi eliminare il segno del filo tramite la stiratura. Non asciugarli con l’asciugatrice. Non lo dirò mai abbastanza: NON ASCIUGARE IL LINO CON L’ASCIUGATRICE, MAI! Una stanza per l’asciugatura (asciugatoio) va bene, ma se vuoi sbiancare un po’ i tuoi vestiti di lino, potresti appenderli all’aria aperta e lasciarli asciugare al sole. Distendere le cuciture e la stoffa faciliterà il passaggio successivo, che è la stiratura. Distendi il lino quando è ancora umido: se i vestiti sono già completamente asciutti, inumidiscili con uno spruzzino. Imposta il ferro con il programma per lino o cotone, di solito alla temperatura più alta, e stira accuratamente l’indumento con il ferro. Fibre lisce e piatte sono più resistenti, se si tratta di lino. Una fibra liscia starà più pulita più a lungo e darà una sensazione di maggiore fresco a contatto con la pelle. I vestiti inoltre non si consumeranno tanto quanto farebbero se indossati quanto la fibra è arruffata.
Dopo averli stirati, riponi i vestiti quando saranno completamente asciutti, tenendoli ripiegati nei cassetti oppure appesi tramite delle grucce.
Passiamo poi agli abiti di lana…
Se il vestito ha l’orlo infangato o delle piccole macchie, di solito è sufficiente scuoterlo o spazzolarlo con una spazzola per abiti mediamente rigida, puoi anche utilizzare l’aspirapolvere se vuoi. Assicurati di spazzolarlo dalle spalle all’orlo, anche sulle maniche. Se hai qualche macchia piccola o superficiale, puoi lavare soltanto la macchia: di solito basta lavarla via con un panno umido. Se le macchie sono più resistenti, potresti aver bisogno di lavarle con dello shampoo o del sapone per le mani. Usa un asciugamano posto sul retro della stoffa per assorbire l’acqua in eccesso e ricordati di risciacquare con cura in modo che il sapone non lasci degli aloni. Se per caso ti è capitato di sporcarti con l’olio della cotta di maglia, pesce o con simili macchie ostinate, dovrai lavare l’intero abito. Lavarlo a mano di solito è sufficiente, altrimenti puoi utilizzare il programma per la lana della lavatrice. Assicurati di usare detergenti adatti per la lana e di risciacquare ogni residuo di detersivo. Premi e strizza via l’acqua dall’abito, senza arrotolarlo con troppa forza, perché potresti danneggiare la stoffa e/o le cuciture. Stendilo su un piano: uno stendino con sopra un asciugamano è di solito una buona opzione. Quando è quasi asciutto puoi appenderlo sulla gruccia e lasciarlo ad asciugare in questa posizione, ma non appenderlo quando è troppo bagnato, perché il peso dell’acqua sulla lana umida o bagnata potrebbe far deformare il tessuto in lunghezza. A differenza del lino, dovresti tenere gli abiti di lana all’ombra quando li fai asciugare, perché il sole rende la lana secca e fragile. Ci sono appunti in fonti medievali in cui si chiede – di solito a un servitore – di spazzolare gli abiti di lana sia all’interno che all’esterno dopo l’uso: l’ho provato sulle mie calze e mi sono accorta che non si rompono così facilmente come accadeva quando non li spazzolavo. Quando i vestiti sono puliti, è ora di appenderli o metterli via: i vestiti puliti attirano meno i parassiti e gli abiti di lino li attirano meno di quelli di lana.
Se un abito di lana necessita soltanto di una rinfrescata, assicurati di stenderlo all’aria aperta un giorno in cui l’aria è molto umida e in cielo ci sono nuvole gonfie di pioggia. Puoi anche spruzzarci un po’ d’acqua sopra, se l’abito è già stato bagnato: se no, potrebbe invece macchiarsi. Mettere gli abiti all’aria aperta funziona molto bene per l’uso normale: 9 volte su 10 fargli prendere aria è già un “lavaggio” sufficiente.
Le mie calze bucate alla gara per le
 "calze peggiori",organizzata dai Merry Swan
 al Middelaldercentret. Foto di Mervi Pasanen
My worn hoses during the 
challenge for the "worst hoses" held by the
Merry Swans at Middelaldercentret.
Photo by Mervi Pasanen


Cosa ne dici del lavaggio a secco, effettuato in lavanderia, per gli abiti di lana?
Non lavo mai a secco i miei abiti. È costoso, non è una scelta migliore per i tessuti ed è molto nocivo per l’ambiente: risparmia i tuoi soldi e fai un favore al pianeta.
Hai qualche suggerimento in particolare a proposito del lavaggio di tessuti tinti con tinture naturali?
Sì, non lavarli. Se proprio devi, assicurati di effettuare un lavaggio veloce senza usare nessun tipo di detergente. I detersivi a volte cambiano il valore del pH e possono influenzare la tintura. Le calze di mio figlio sono passate dal viola al verde, per questo…
A proposito di parassiti: cosa ne pensi della lavanda, del cedro o di altri oli essenziali? Funzionano davvero?
Non c’è evidenza scientifica che funzionino davvero, ma non fa nemmeno male, e i vestiti fanno un buon profumo, per cui perché no? Per sconfiggere i parassiti, vale davvero la pena di provare tutti i trucchi che ci sono a disposizione. La pulizia è quello che tiene davvero i parassiti alla larga: prendi fuori e controlla gli indumenti di lana, ogni tanto, pulisci i ripiani con un panno umido, passa l’aspirapolvere negli angoli dell’armadio e assicurati di riporre gli abiti in modo che ci sia abbastanza aria tra uno e l’altro.

Cosa fare se gli abiti si stanno consumando?
Rattoppali e rammendali in tempo, prima che si rompano troppo. Le toppe possono essere messe sia all’interno che all’esterno dell’abito, ci sono fonti per entrambe le soluzioni. Toppe di colori diversi vanno bene, ma erano probabilmente più diffuse nei ceti più bassi della società. I più ricchi avrebbero ritenuto importante che i rammendi fossero più discreti.
È inoltre noto che nel Medioevo c’era un fiorente mercato di abiti usati, per cui i vestiti continuavano ad essere passati di mano in mano e rivenduti ai ceti sociali più bassi quando erano consumati, rovinati o fuori moda.

In cosa i tessuti di lana moderni si differenziano da quelli medievali?
Se non scendiamo nel dettaglio dei filati utilizzati e delle tecniche di tessitura… prima di tutto, la lana e il tessuto vengono lavati in modo più aggressivo durante la fabbricazione: questo significa che la lanolina (il grasso della lana) scompare dalla lana, facendo sì che il tessuto non sia più così resistente allo sporco e all’acqua. Quindi, ingrassare nuovamente gli abiti di lana con la lanolina non è mai una cattiva idea, in particolare se si tratta di sopravesti, che possono così diventare più resistenti alla pioggia. La lanolina si può trovare dove vengono venduti pannolini lavabili per i bambini.
Buon lavaggio!  
... e grazie mille a Maria per i preziosi consigli!


Vestiti a prendere aria in un giorno nevoso: foto e abiti di Mervi Pasanen. /
Garments airing in a snowy day: picture and garments by Mervi Pasanen.

ENGLISH
What is the first thing to do when you get home after an event?
Unpack! Do not allow moist, dirty clothes to lie down packed longer than necessary. It's not fun to pack up a month later and find your clothes mouldy.
If we discuss material by material then, how do you take care of your linen items?
Linen garments could be washed, depending on how dirty they are. They can be machine-washed at 40 or 60 degrees with a conventional detergent without optical bleach. Do not use fabric softner as they will encapsulate the fibers and prevent them from moisture as well, making them feel warmer than necessary. It also breaks down the linen fibers in the long run.
When the clothes are washed make sure to stretch the seams and smooth the garments before hanging them up on a clothes hanger of hung up with clothes pegs. Avoid hanging them over a line, you don’t want to try to iron that mark after the line afterwards . Do not tumble dry! This can’t be said enough! DO NOT TUMBLE DRY LINEN, EVER! Drying room is ok, but if you want to bleach your linen clothes a bit, you may want to hang them out and let them sun dry. Stretching the seams and smoothing out the fabric will facilitate the next step that is ironing. Stretch the linen when it is slightly moist, so if you garment  have dried dry completely, then moisten with a spray bottle. Put the iron Cotton/ Linen heat, usually the highest heat, and smooth the garment properly with the iron. Smooth and flat fibers are more persistent fibers when it comes to linen. A flat fibre will stay cleaner for a longer time and will also feel cooler on your skin. The clothes are not torn as much as they do if you use them when the fibers are fluffy. When the clothes are ironed, store them when they are completely dry, keeping them folded in drawers or hanging on the hangers.
Antti, il vincitore indiscusso della gara per le calze
peggiori. Serve decisamente un rammendo! Foto di
Mervi Pasanen. / Antti, the winner
for the wost hoses contest. Some mending needed here!
Photo by Mervi Pasanen
If we move on to the woolen garment then ...
If the garment has got a muddy hem or smaller stains, it is usually enough to shake them or brush with a medium-hard clothes brush (you can vacuum if you want). Always make sure to brush from the shoulder to the hem, even on your sleeves. If you have any small and superficial stains, you can just wash the stain: it is often enough to wipe away the stain with a damp cloth. But if the stains are harder, you may need to wash them with some shampoo or ordinary hand soap. Use a towel on the backside to soak up excess water and do not forget to rinse properly so that you do not get stains from the soap. If you have managed to get oil from chain mail, fish or similar really tough stains, you will need to wash the entire garment. Hand washing is often enough, but otherwise you can run the wool program on the washing machine. Be sure to use detergents intended for wool and rinse out any detergent residue. Press and squeeze the water out of the garment. Do not twist too hard, as it may damage the fabric or/and the seams. Dry it flat. A folded drying rack with a towel on top is usually a good option. When it is almost dry you can hang the clothes on the hangers and allow the rest to dry in this way. Do not hang up too early as the water weight from a damp / wet wool can make it stretch in length. Unlike linen you should keep the wool clothes out of the sun when drying them. Sun makes wool dry and brittle.
There are notes from the Middle Ages asking to brush (or rather get a servant to brush) their woolen garments both externally and internally after use. I have tested this on my hoses and I found that they don’t break as easily as when not brushing them. When the clothes are clean then it's time to hang or pack them away. Clean clothes are less attractive to pests, and linen clothes are less attractive than woolen clothes. If a wool garment only needs some light refreshment, be sure to hang them out one day when the rain is in the air and the clouds are heavy in the sky. You can also spray some water on the woolen garment if they have been washed before, otherwise water stains may occur. Airing works very well in normal use. 9 times out of 10 airing is enough of “washing”.
How about dry-washing woolen garments? I never dry clean my clothes. It’s expensive, not better for the fibers and very bad for the environment. Save your money and make the earth a favour.
Do you have any special recommendation about washing plant-dyed fabric? Yes, don’t wash them. IF you must, make sure to a quick wash and avoid using detergent, at all. The detergents are sometimes changing the pH value and can affect the dye. My son’s hose went from purple to green because of it...
Concerning pests: how about lavender, cedar and essential oils? Does it really work?
There is no scientific evidence that it will work. But it does not hurt either, and the clothes smell good, so why not. In the case of pests, you really want to try all the tricks you can. Cleaning is what keeps pests out. Take out your woolen things from wardrobes  and check them every once in a while. Wipe shelfs with a damp cloth, vacuum corners and make sure to store your things with a bit of air in between them.
If your clothes are getting worn out?
Patch and repair in time, before it breaks up too much. Patches can be set both inside and outside of the garment. There is evidence of both. Different colors are ok, although it is probably more likely in the lower circles of the social hierarchy. If you had money, it would have been important that the repairs were more discreet.
It is also known that there was a large second hand market for clothing in the Middle Ages, the clothes continued trickle down though the lower social classes when they were worn, injured or outdated.
How does today's wool fabrics differ from the Middle Ages?
If we do not go into the thread appearance and weaving techniques ... First of all, the wool and the fabric weave are washed harder during fabrication. This means that the lanolin (wool fat) disappears from the wool and the finished fabric will not become so resistant to dirt and water. So, to re-grease the wool garments with a lanolin is never wrong. This is especially important when you get to outer garments, which then get better resistance to rain. You can find lanolin where they sell washable diapers for kids.
Happy cleaning! ... and thank you so much Maria for the precious advice!